
Hi there, Mellionaire House friends!
It’s officially my FAVORITE time of year again…fall. Today we’ll be talking about How To Create a Pumpkin Patch Photo Scene. I’ve loved everything about the season of fall for as long as I can remember. Even though I’ve grown up in and lived in Florida my entire life, and have never really experienced anything like “watching the leaves change colors,” I still love fall and all that it brings with it here in The Sunshine State. And with everything going on these days, I’m looking forward to enjoying this season like never before, but in the safety of our own home. So today, I’m sharing some simple and affordable tips on How To Create a Pumpkin Patch Photo Scene in your own back yard. But before we get into that, I’d like to share a little more about myself, since there are so many new followers here.
By the way, a BIG HELLO to everyone new (and of course to everyone who’s been here for a while) to my blog! I welcome you, and it is my hope that you find lots of inspiring content on my platforms. My name is Melonie, and I’m a Better Homes & Gardens Stylemaker! I was born and raised right here in beautiful Tampa bay, and I am an Alumni of Florida State University…Go ‘Noles! I met my husband (whom we affectionately call Benjamin Buttons because he truly ages backwards) shortly after I graduated, and we have three amazing children. Our oldest daughter will be 16 very soon, and our twins will be 10 very soon. I can’t even believe I just wrote that! My, how time really does fly.
After working in corporate America for most of my young professional life, and being on the road more than I was at home, I decided that I wanted to be able to spend more time with my family. I’ve always had an eye for interior design, and started blogging about it as a hobby. After a brief adventure working in the world of Real Estate and Professional Home Staging, I moved into Content Creation full time. My role as a Better Homes & Gardens Stylemaker is literally a dream come true! I get to be creative, inspire people, and create content for followers that is not only on trend, but simple and affordable, using Better Homes & Gardens at Walmart products. I’m so thankful that you are here, and I hope that you are inspired to stay. I post daily and weekly on my Instagram and YouTube platforms, so please check me out over there if you haven’t already…and definitely subscribe to my YouTube channel!
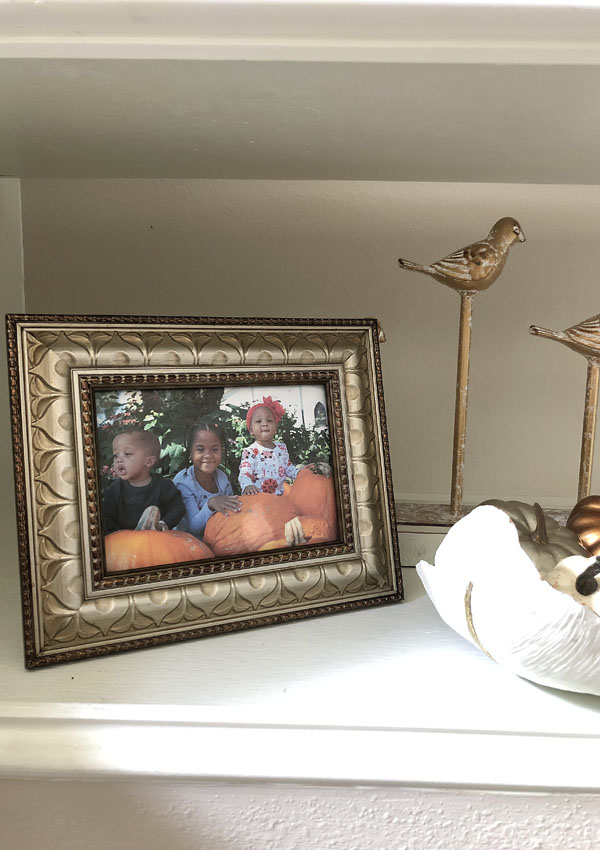
As I mentioned earlier, in today’s blog I’m sharing my top tips on How To Create a Pumpkin Patch Photo Scene in your own back yard. Ever since our children were born, I’ve LOVED taking them for a visit to the pumpkin patch each year to pick out some pumpkins and take beautiful photos. I’d dress them up in totally adorable fall outfits…boots, jeans and cozy sweaters. So much fun! Check out this one from when the twins had just turned a year old, and The Prima still had her baby teeth…it’s my all time favorite!
But now, things have changed. Safety has become a top priority, and people are staying home more often. A visit to the pumpkin patch would most likely also mean photos with face masks on. So, I started thinking outside of the box, on how to get my beloved annual shot of my children in a pumpkin patch, and thought…”why not just create my own?” So that’s exactly what I did, and it was really very easy. So today, I’m sharing my top tips on How To Create a Pumpkin Patch Photo Scene in our own back yard.
Tip #1 – Set Up Some Cozy Seating
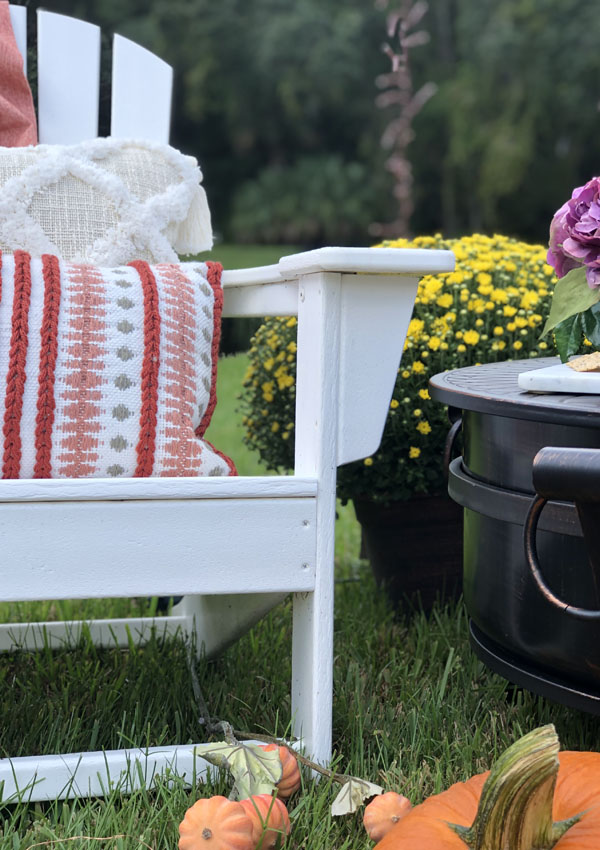
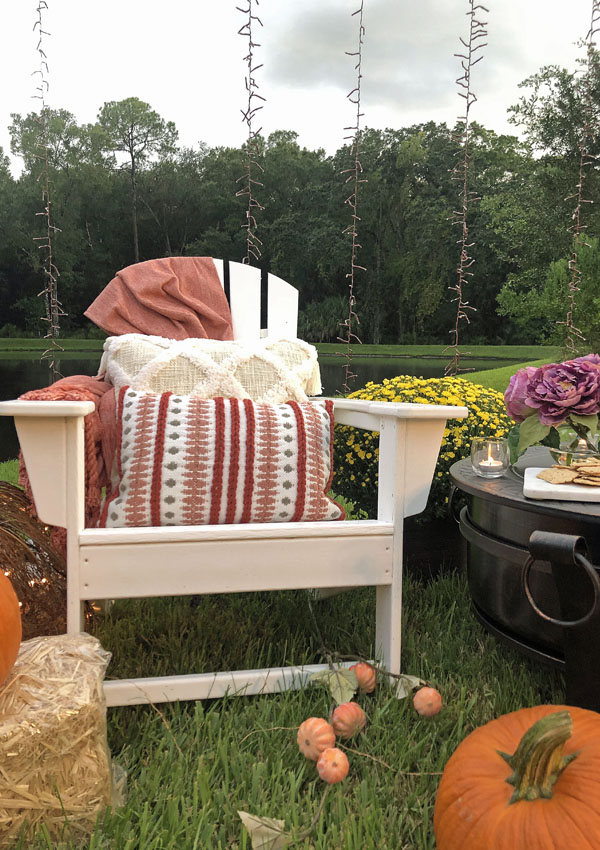
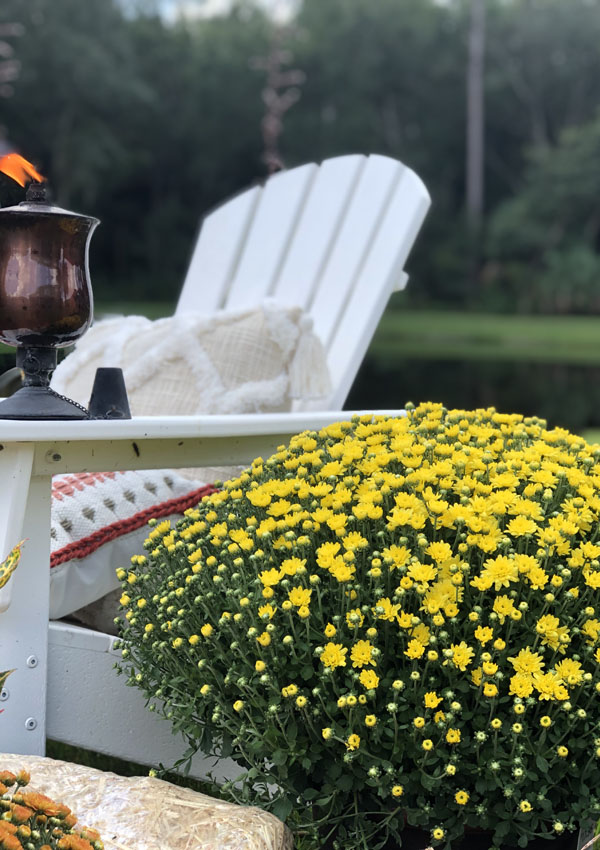
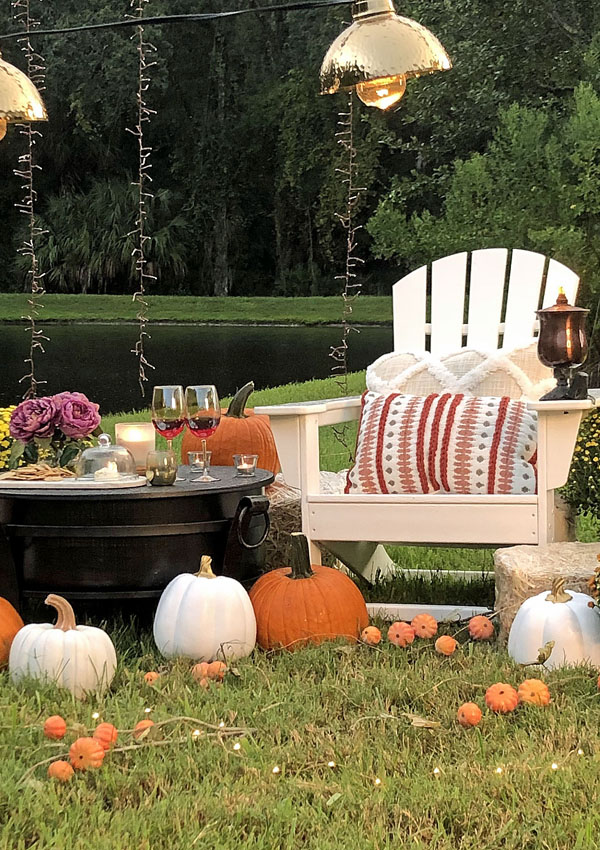
The one thing that I’ve always loved out our annual pumpkin patch visits, is that everyone always looks so cozy in the picture. In most of the shots, the children were sitting on either a tree stump, or bails of hay. I would usually bring in my own blankets as props that we may or may not have used. So, you’ll want to do the same thing in your own back yard. Bails of hay are available at Walmart, so pick up a few of them. You could either spread them out to make a pile for everyone to sit on. Or, if you don’t want the clean up, leave them in the bail and strategically place them around your seating. Instead of a blanket, I chose to use these Adirondack chairs. I know, these chairs usually make us think about summer. But hey, we live in Florida. It’s practically summer here all year round. They are also really comfortable, and I liked the way the hay looked around them. So, there you go. Grab a blanket, bean bags…or even Adirondack chairs, and stage your scene with hay.
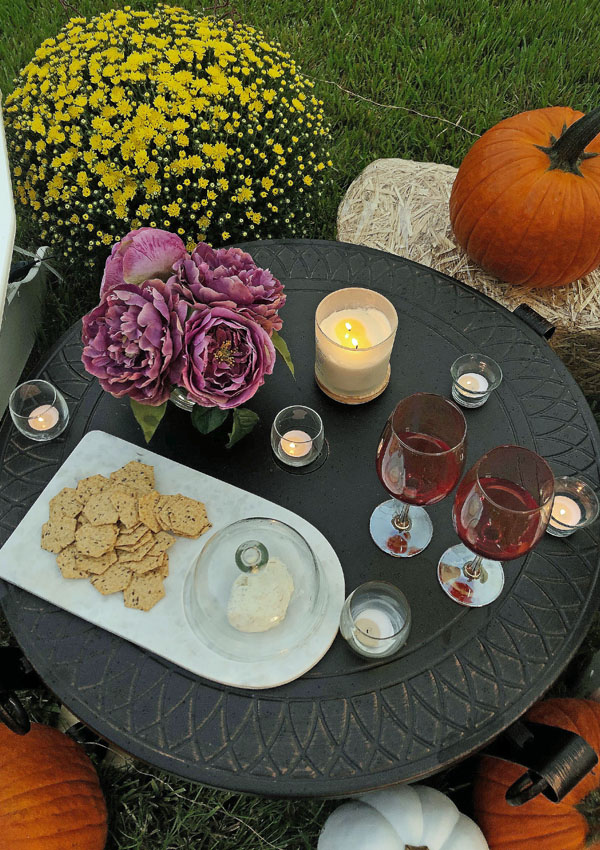
In addition to the Adirondack chairs, I also added this beautiful Table Top Fire Pit. While I realize that it’s still pretty early for most of us to crank up the fire pits, this one was nice because it comes with a tabletop and cover. So, that meant that in the twilight hours, Benjamin Buttons and I were able to stage a shot for just us two, with some wine and cheese. It turned out very romantic, don’t you think?
Add in some colorful accessories like blankets or the Indoor/Outdoor Throw Pillows that you see here.
Tip #2 – Add Your Pumpkins & Mums
Okay, okay…I realize that this is an obvious tip about adding the pumpkins. But, I wanted draw your attention to the fact that I mixed in real pumpkins with artificial ones. So if there are no real pumpkins available in your area, grab some faux pumpkins from inside of the house and bring them out. They don’t all need to be orange. In fact, mix it up! If you have some white or multi-colored stacked pumpkins, bring them out for the shoot. Arrange them in varying heights, like I did below. Then…bring…in…THE MUMS! Better Homes & Gardens at Walmart offers a beautiful variety of mums in varying colors and sizes. So I grabbed a few to help set the scene, and they worked out perfectly.
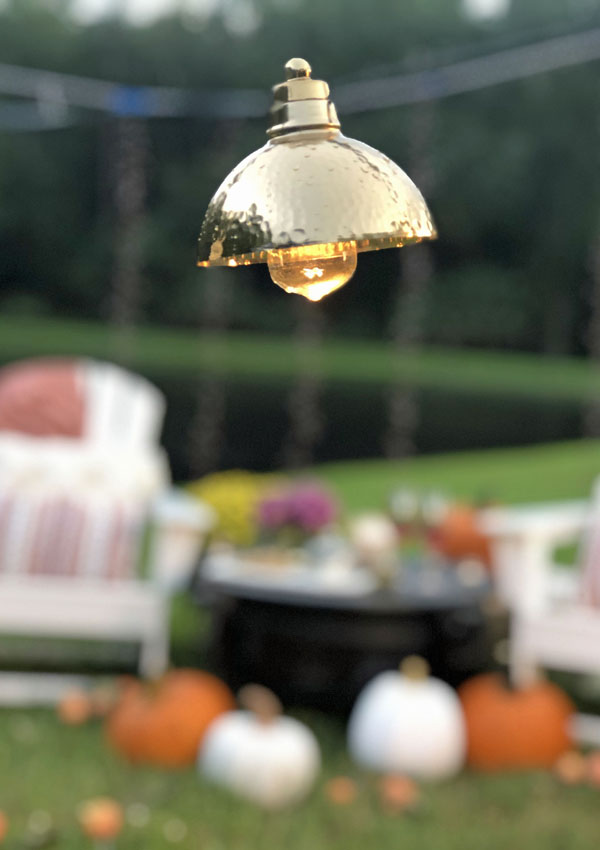
Tip #3 – Bring In Ambient Lighting
This one may sound difficult, but it really doesn’t have to be. Not everyone has tripods to string lights from like I do, but you can also use sting lights for ground cover. I added three different types of Better Homes & Gardens String Lights to my scene. In the background, I added the 200 Count Micro Willow Tree Lights. I used two strands, but I am going back for more. They are solar powered, so I didn’t need to worry about running an extension cord. They are sensor activated, and offer up to 8 hours of light. They really helped to give my photo scene some dimension. I coupled some Clear Glass Globe String Lights with the Willow Tree Lights, and it looked SO pretty.
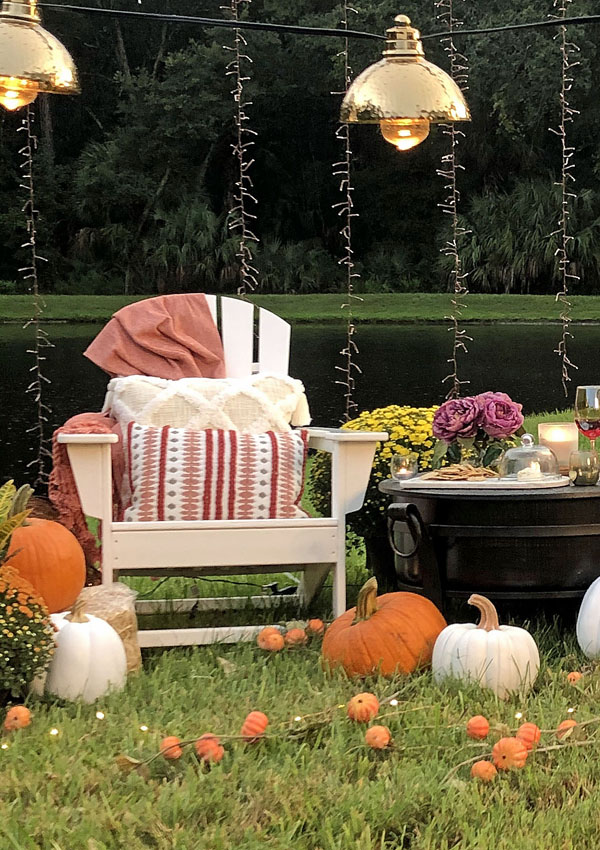
In the front of the scene, I added these Hammered Metal String Lights from the top, and some fairy lights I’d already had in the grass. It was tough to get a night time shot to show you how beautiful everything turned out. But it really did look magical.
That’s it. So easy, right? The only other thing you’ll need when we think about How To Create a Pumpkin Patch Photo Scene in Your Own Back Yard is a photographer…but Better Homes & Gardens at Walmart doesn’t offer photographers. 🙂 But you can use a front facing phone, or a time delay on your camera to snap your shot.
I hope you enjoyed this blog and got some creative ideas! I have lots more to share with you this season, so again, please stay tuned-in on my YouTube channel. Until next time,
Love & peace
This blog post is sponsored by Better Homes & Gardens at Walmart. As part of the BHG Live Better Influencer Network, I am privileged to share awesome tips and inspirational ideas using Better Homes & Gardens at Walmart products. I will receive compensation for my time and effort to create these posts. But as always, my opinions are my own. The convenient shopping links I will provide for you will help support the blog, at no additional cost to you. Thank you for your support!
Thanks for the tips! I’ve recently subscribed to your YouTube channel and I’m thrilled each time you post. Your style is absolutely stunning and always presented with class and elegance. Continue to inspire us all..
OMG, this is incredible. I am in Love… I may not have a gorgeous (to die for) backyard as yours Mel, but I do have a long balcony looking at nature and the water (with swans).
Thank you soooo much dear. This would be a great project for my balcony.
Love Emine Pala